We Will Show You Exactly How to Pass Core Web Vitals
If you have a WordPress website and you have been struggling to make it compliant with Google’s new Core Web Vitals, you have come to the right place. This detailed post will not only explain what Core Web Vitals are and why they are important but also show you exactly how to get your WordPress website compliant with Google’s new ranking factor.
“By the end of this post you will have the knowledge and the know-how to ensure that your WordPress website passes Google’s Core Web Vitals with flying colors.”
Jarrett Gucci – Owner of WP Fix It
What Are Core Web Vitals?
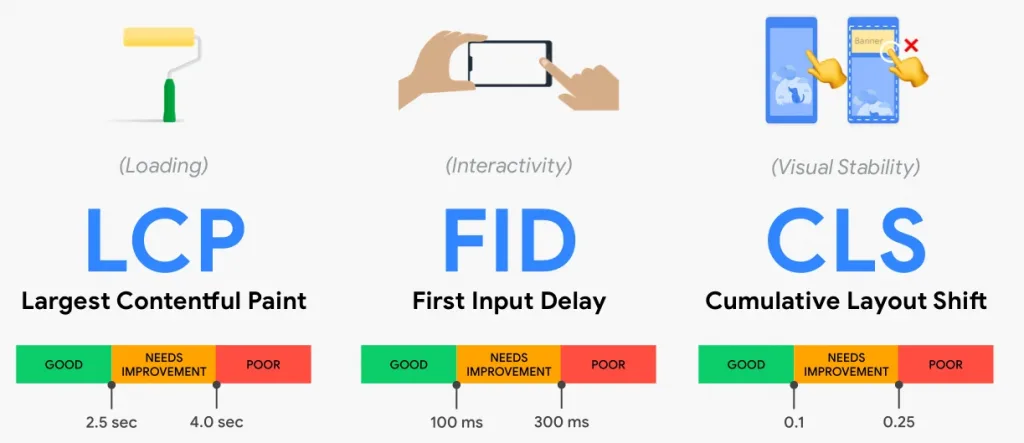
Core Web Vitals are a set of specific factors that Google considers important in a webpage’s overall user experience. Core Web Vitals are made up of three specific page speed and user interaction measurements: largest contentful paint, first input delay, and cumulative layout shift.
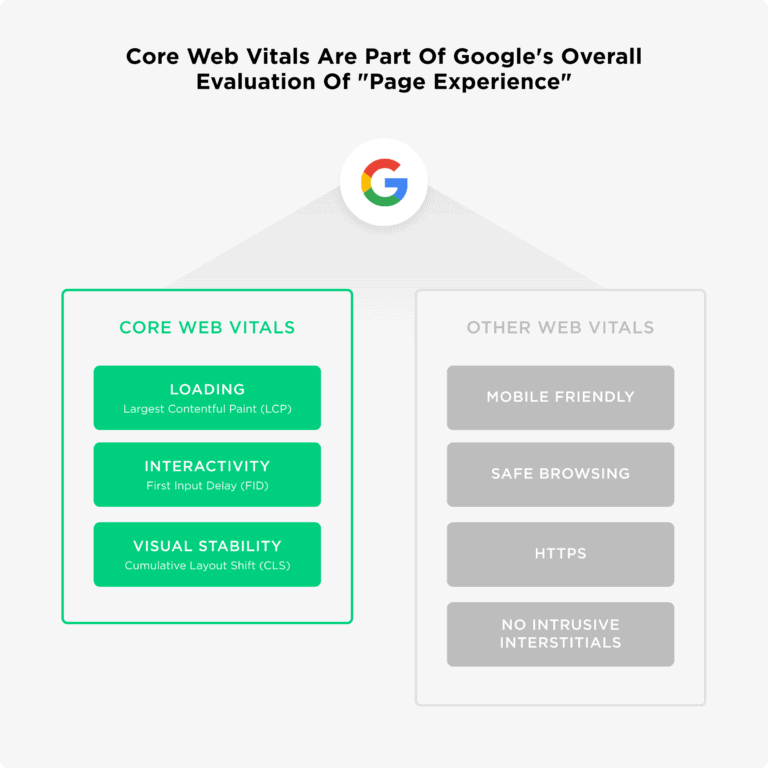
In short, Core Web Vitals are a set of factors that will be part of Google’s Page Experience Update score (basically, Google’s way of sizing up your page’s overall user experience). This means Google wants to assign a score as to how well the experience is for a visitor that comes to your website on any particular page.
Why Core Web Vitals Important?
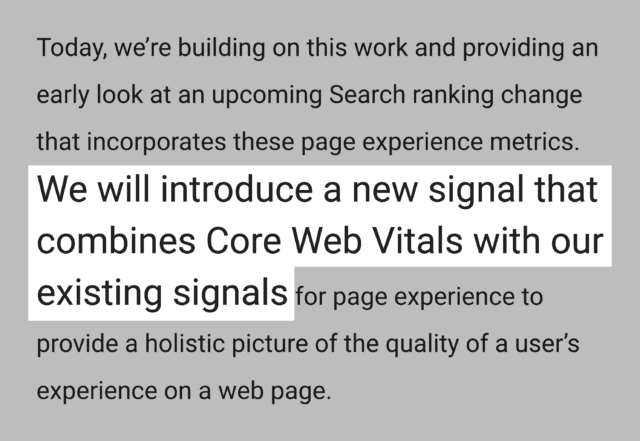
Google did a major update to their ranking algorithm this year which adds a ranking factor called page experience. Google first spoke about this major algorithm update back in May of 2020. You can see the information on this communication from Google at https://webmasters.googleblog.com/2020/05/evaluating-page-experience.html.
Now it’s very important to understand that while this algorithm update and introduction to Core Web Vitals could change the ranking factors of your website and its contents, the main and most important ranking factor is still good content. Let us say that again… content is King and still the main ranking factor.
Let us say for example that your website is in a tie for a specific keyword and you have done a better job of being Google Page Experience compliant by passing your Core Web Vitals with flying colors, you will likely outrank the URL that you are tied with.
There is an ongoing trend with Google and their goal to provide not only the most relevant search results when somebody does a search but to also provide a list of results of the websites that have the best user experience.
Where Can You See Core Web Vitals?
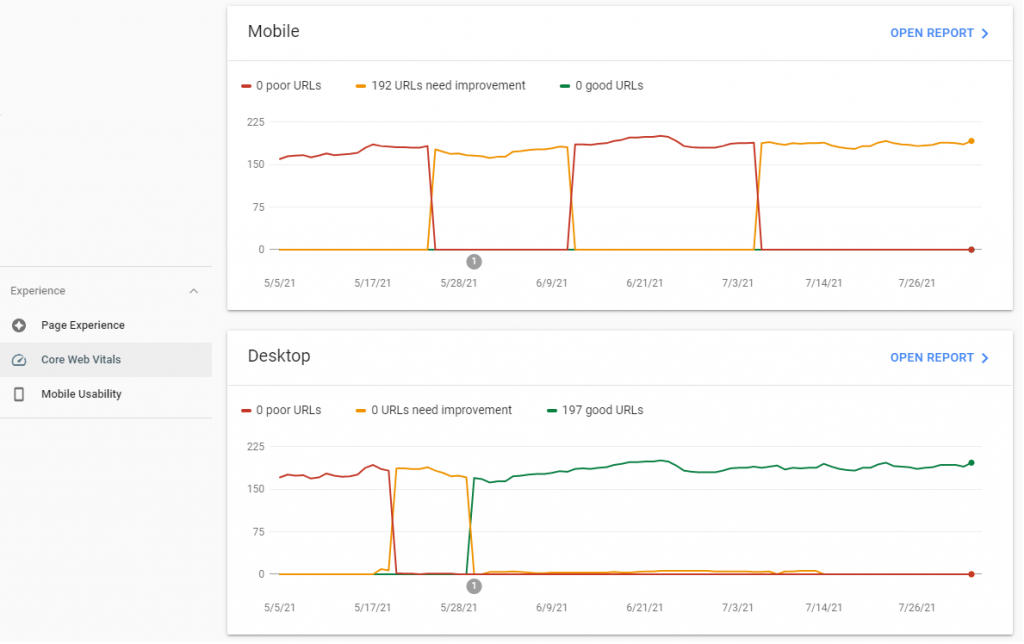
If you are familiar with the Google search console you will notice a new section called “Experience”. Within this section you will see Core Web Vitals. The Core Web Vitals section of your Google search console will provide a report based on two different website viewing platforms. This will be a mobile report and a desktop report.
If you are not familiar with Google search console and you do not have this connected to your website there is a great article at the link below that can get you rolling on setting up your website and managing it inside of Google search console. Do it if you want to rank better and see how your site is viewed by Google.
SETUP GOOGLE SEARCH CONSOLE ON WORDPRESS:
https://www.wpbeginner.com/beginners-guide/how-to-add-your-wordpress-site-to-google-webmaster-tools/
What Makes Up Web Core Vitals
The major portion of what makes up Google’s web core vitals is the actual speed of the page load. To put it more simply, the time it takes for a specific URL to load. Now you may be extremely familiar with this as having a WordPress website it is always a good strategy to make sure that it is fully optimized for speed so that your visitors can load and access your content quickly.
Google’s Core Web Vitals is not only about speed but also very much about how the content is laid out on a page and what it goes through as the page load happens. A great simple example of this is if you have a piece of content that changes location during the page load, this could affect your Core Web Vitals negatively.
Take a look below at a breakdown of the big three main scoring categories that make up the total grading for Google’s Core Web Vitals.

⚡️ 1. Largest Contentful Paint (LCP):
Measures loading performance and speed. Ideal loading time is 2.5 seconds or less of a user landing on a page.
Set forth plainly, LCP is the stacking time, or a proportion of page’s stacking speed until where somebody would first be able to associate with and see its substance.
The greatest square of text or picture the client can see is surveyed – anything stretching out past the screen isn’t checked. Nonetheless, components which are first found in the viewport and afterward get moved out of view could wind up being essential for the LCP estimation.
Google estimates a wide range of pictures, and text-block components including section labels.
Basically, any square level HTML component containing text components can be utilized. (SVG components, notwithstanding, are not.)

⚡️ 2. First Input Delay (FID):
Measures interactivity of a web page. FID of 100 milliseconds or less is considered optimal.
Simply imagine that you are in the woodland and a tiger comes before you, what will you do now? Your brain will freeze for quite a while. At that point following a couple of moments your mind will work. Hello, Tiger is coming here, flee from here soon.
Presently when you see the tiger and pursue seeing the tiger. The time between you seeing the tiger and fleeing from that spot, that time is the principal input delay.
At the point when your guest visits your site and in the wake of stacking all substance of your site he will tap on some connection or component.
FID isn’t the point at which the activity happens in the wake of tapping the catch. FID is the point at which the site begins working subsequent to tapping on the catch.
So FID implies what amount of time it requires to enroll client contact, tap or snap and how that snap is making a move on that.

⚡️ 3. Cumulative Layout Shift (CSL):
Measures a website’s visual stability. A CLS score of less than 0.1 is the baseline for a good user experience.
Cumulative Layout Shift is the sum total of all individual layout shift scores for every unexpected layout shift (the abrupt movement of content on a page) that occurs during the entire lifespan of the page (the period of time the page is kept open).
This is commonly due to something like an image or video with unknown dimensions, a font that renders differently than its fallback, or a third-party ad or widget that resizes itself.

So What is Needed to Pass Web Core Vitals?
All right we have explained what Google’s Core Web Vitals means and hopefully also explained why it’s important to be compliant and get your scores where they need to be to improve your rankings. But just having that information alone is not enough to get your WordPress website compliant.
The the rest of this article will be focused on the actual process that you can take to make your WordPress website compliant with Google’s Core Web Vitals scoring system.
We are going to do our best to explain this in the simplest form so that anybody regardless of their technical skill set will be able to walk through the steps and make it happen.
Ingredients Needed to Pass Web Core Vitals
Now in order for this post to give you true value and something tangible that you can actually reference back to when you want to make your WordPress website compliant with Google’s Core Web Vitals, we are going to perform this on an actual website and show you step by step what to do.
Please take a look at the images below for the before benchmarking Core Web Vitals testing that was completed using Google’s testing tool Google Page Insights.
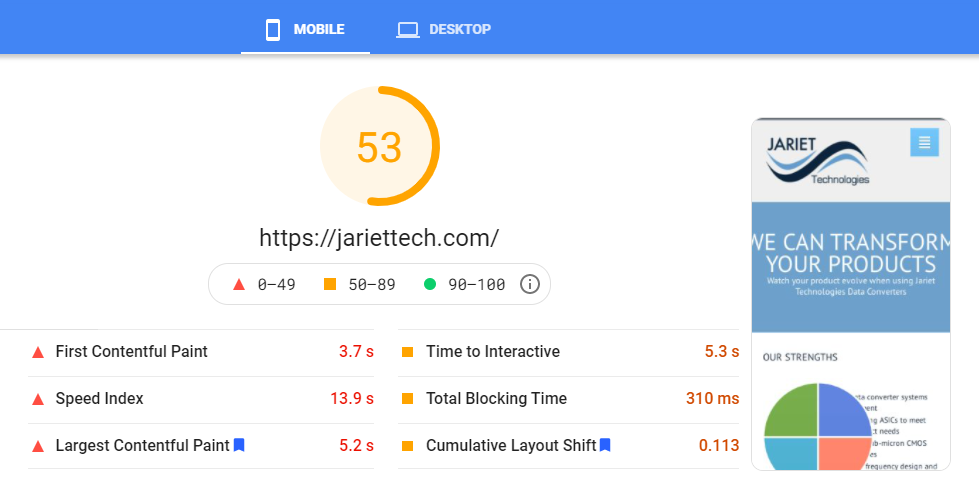
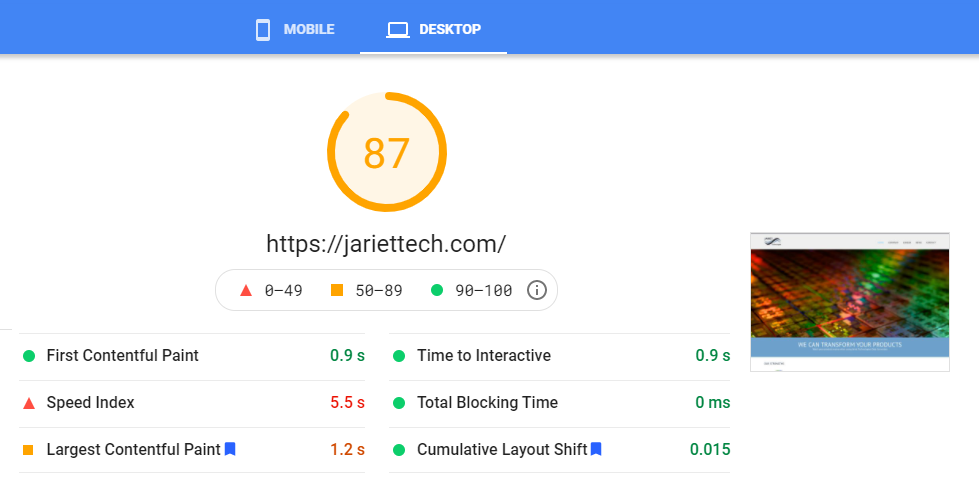
You can see that the mobile and desktop scores are not in compliance with what is required to create a good page experience according to Google. We are going to show you how we take this website and go through a list of steps to make this pass Google’s Core Web Vitals with flying colors.
As you may remember earlier in this article we explained how Google’s Core Web Vitals scoring system is based on the speed in which a particular URL loads and the way the content on that URL displays as the load happens.
So with this said, we are going to break up the steps needed to pass Core Web Vitals into two main categories. The first is going to be content layout and the second is going to be speed optimization.
📝 ITEMS NEEDED FOR CONTENT LAYOUT
There are some very specific things that we will need to accomplish a WordPress website that is fully compliant with Google’s Core Web Vitals grading system. Let’s dive into what those things are below before we start taking action and doing the work.
Fast and Furious WordPress Theme
There are so many theme choices available for your WordPress website. The majority of themes that people are using have a lot of issues when it comes to being compliant with Google’s Core Web Vitals. You need to ensure that you are using a WordPress theme that is not loaded with a bunch of JavaScript and CSS creating functionality that slows down the load of your content.
We have done extensive research on finding the fastest and also extremely feature-rich WordPress theme that will lead you to success with Google’s Core Web Vitals. This theme that we have found and we use often to help our customers is called Page Builder Framework.
This theme is amazing and has several articles all over the web on how it is one of the fastest and less bloated WordPress theme available.
😳 THIS THEME IS NO JOKE!!!
You don’t have to take our word for it. You can look at the research why this theme is extremely impressive when it comes to speed.
This theme is FAST!
Take a look at the some article at the links below.
The Page Builder Framework theme is a free theme that offers a premium add-on plugin giving it additional functionality and customization options.
– see theme details here
– see premium plugin details here
We always recommend that WordPress users invest in the premium upgrades or add-ons to a theme or plugin that they are looking to use for the success of their online presence.
It’s also really great to support these developers that create these amazing tools for us to present our products, services or information online.
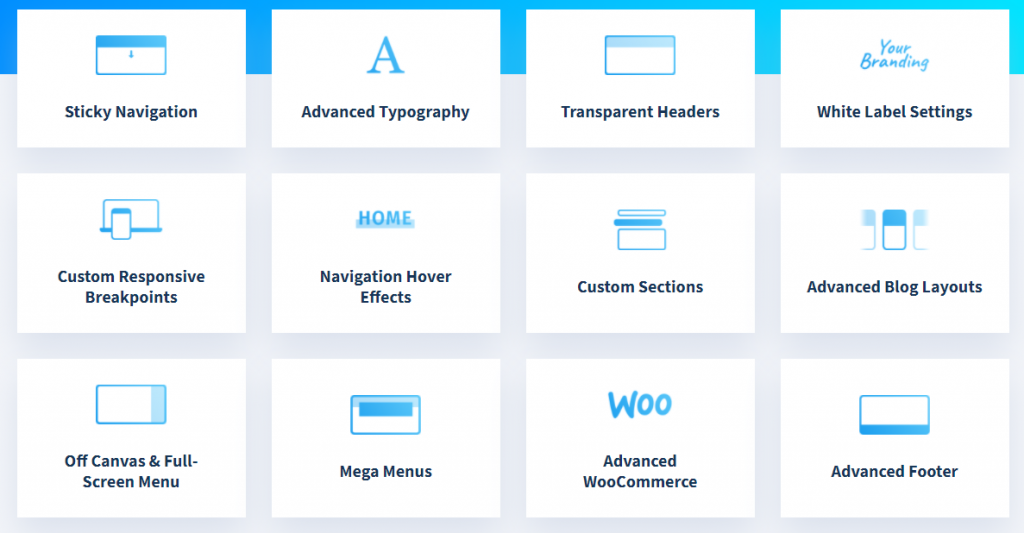
Take a look below at some of the power features that are included with the premium plugin add-on for the Page Builder Framework theme.
Now at this point you may be wondering why in the world are we sharing with you a new theme to use on your WordPress website.
Remember that the goal here is to make sure that your contents loads extremely fast and loads without movement. It’s most likely that the reason you are not passing Google’s Core Web Vitals at the moment is because your current theme cannot comply with what is necessary to get the scores you desire.
This is why it’s important to have the foundation of your website in reference to the theme, to be very fast and very stable when it comes to building out your content.
Hopefully this gives you an insight as to why you will be changing your theme in order pass Google’s Core Web Vitals. Just hang in there through the end of this post as we will show you how the theme is such a massive part of this entire process and BLOW YOUR MIND at the results.
Later on in this article when we start taking action on converting a website to comply with Google’s Core Web Vitals, we will be using the Page Builder Framework theme accompanied with the premium plugin add-on.
It’s also important to mention as we will show you later that the premium plugin- add-on does include some performance optimization features which will make a quicker path to high scores for your Core Web Vitals.
Supporting Plugins For Your Theme & Content
Now since we will be changing the theme we want to make sure that we are still keeping the branding and functionality of the old theme that is in place. The goal is not to redesign the website. The goal is to restructure the foundation of the website and the process in which the content loads. Doing this will ensure that we pass Google’s Core Web Vitals like a champ.
So in order to make sure that we stay in tune with what the website currently looks like we are going to need a few supporting plugins. The website that we will be performing be Core Web Vitals compliance on in this article is currently using a page builder for its content.
We highly highly recommend against using a third-party page builder. Many WordPress users have not taken the full plunge into using the built-in Guttenberg page editor for their content but let us tell you that it is extremely powerful and will lead you to success with your content display.
The majority of the reasons why WordPress websites are slow and do not pass Google’s Core Web Vitals is because of page builder plugins. There are so many users out there that use page builder plugins to lay out their content and we advise against this as you can use the built-in Gutenberg editor that comes with WordPress core.
If you are absolutely married to your current page builder plugin, the good news is that the Page Builder Framework is named this way because it works with all major page builders.
It is important to recognize that you are going to have a more difficult time passing Google’s Core Web Vitals if you decide to stick with a third-party page builder plugin instead of using the built-in Gutenberg editor which comes very nicely equipped inside of WordPress core.
Below is the list of content supporting plugins that we will use on the websites in this post.
- Blocks CSS: CSS Editor for Gutenberg Blocks – https://wordpress.org/plugins/blocks-css/
This plug-in gives us the ability to add custom CSS rules for every unique Gutenberg block. It comes in handy when you need to make styling changes on the fly for any single Gutenberg block. - Ultimate Addons for Gutenberg – https://wordpress.org/plugins/ultimate-addons-for-gutenberg/
Super powerful free plugin gives you an array of slick Gutenberg blocks that are not included and WordPress core. One of the greatest things that this plugin does to enhance the functionality of the Gutenberg editor is it gives you block visibility options based on device. This means that you can show or hide a Gutenberg block based on the type of device (mobile, tablet or desktop) that is viewing the content.
There may be additional content supporting plugins needed to change your website content over on the Gutenberg editor. This list above is simply the ones that we will use during the transformation on the website in this post.
🚀 ITEMS NEEDED FOR SPEED OPTIMIZATION
The actual load time of any single URL within your WordPress website is a major part of passing Core Web Vitals. To maximize the speed of your website you need to optimize the contents you have built. To do this we will need the following.
Premium Caching Plugin
There are only two premium WordPress speed optimization plugins that we would ever recommend to WordPress users because of the extensive experience and interaction we have had with both.
We have a WordPress optimization service which we have been performing since 2009 on hundreds of WordPress websites all over the world.
As part of the service that we offer we do include a premium caching plugin which will be selected based on the needs of the website and what will allow for maximum speed.
The two plugins that we offer and recommend:
- WP Rocket – https://wp-rocket.me/
- Swift Performance Pro – https://swiftperformance.io/
At this point you may be asking yourself which plugin is best suited for my website. This is a difficult answer to give in this post because every website is built and hosted differently. Without knowing the inner workings of your hosting environment and other factors, it is hard to give you a decision on which caching plugin you should use.
We will be using WP Rocket on the website in this post and if you are interested in the on-going debates of how these two plugins compare and stack up to each other you can visit the link below for some great information.
Swift Performance vs WP Rocket:
https://wpjohnny.com/swift-performance-vs-wp-rocket-wordpress-cache-plugin-comparison/
🎉 Let Take Action Now to Pass Google’s Core Web Vitals
Hopefully you are still with us because you have now reached the portion of this article where we are going to actually start doing the work and showing you how we will take a website that is currently failing miserably on Google’s Core Web Vitals and bring it into the promise land to pass with flying colors.
We are going to break this portion down into two sections because it is going to be a lot of information and the steps, while we will try to keep them to a minimum, are pretty detailed and extremely action focused. The first section that will walk through to take action on is going to be the content layout.
Content Layout Steps to Pass Core Web Vitals – 10 Total Steps
Is now time to dive into the steps that we will take to lay out the website content in a way that will please Google and allow you to pass Core Web Vitals.
STEP #1 🔥 Create The Development Area
Since we are going to be doing a lot of content manipulation, it’s important that during this process we are not messing with the live production site which your website visitors are interacting with and visiting often.
We want to create a development area that will allow us to adjust the content to comply with Google’s Core Web Vitals and not interfere with our live production site.
👍 Steps Outlined From The Video
- Create a sub-domain dev.yourdamain.com
- Clone live site to sub-domain location
- Turn of search engine indexing
💡 Helpful Resources to Complete Steps
STEP #2 🔥 Install Theme and Create Child Theme
As talked about earlier in this article we are going to lay out the content on the website using a streamlined WordPress theme.
This is super important because the theme of choice that you pick to be the foundation of your website content will set you up for success and make sure that you pass Core Web Vitals.
We also want to make sure that we are following a child theme strategy to ensure that if you will be adding any custom functionality to your theme that this would be created in your child theme so future parent theme updates will not erase your creations.
👍 Steps Outlined From The Video
- Install Page Builder Framework theme
- Create a child theme
- Remove unused themes
💡 Helpful Resources to Complete Steps
STEP #3 🔥 Install Supporting Content Plugins
In this step we are going to install the needed supporting plugins for manipulating our content to pass Google’s Core Web Vitals.
These plugins are essential to make content adjustments with minimal effort and maximum flexibility.
Remember the goal is not to redesign the website content or change the look of your production site but to ensure that the way the content is laid out it will comply with Core Web Vitals scoring.
👍 Steps Outlined From The Video
- Install Blocks CSS: CSS Editor for Gutenberg Blocks
- Install Ultimate Addons for Gutenberg
- Install Page Builder Framework Premium Addon
💡 Helpful Resources to Complete Steps
STEP #4 🔥 Install Speed Optimization Plugin
You may be wondering why we are already installing a speed optimization plugin before we even begin to adjust the content.
The reason is that there are two very powerful features that come standard with the speed optimization plugins mentioned in this article which will be needed in order to be compliant and score well on our Core Web Vitals.
The first feature is the ability to LazyLoad images and iFrames. What this does is that it will actually delay the display of images and any embedded iFrames that are not within the window view of the page a visitor is looking at. This will dramatically increase the page load time and help your scores on Core Web Vitals.
The other important feature to make sure it is enabled before you start adjusting content, is the add missing images dimensions.
When a browser is displaying a web page, it loads the HTML first and waits for the images to be downloaded. If the width and height values are available, browsers can use that information to reserve the space needed for the images on the page.
When space for an image is not reserved, the browser will move content around to accommodate the image once the image is downloaded. This layout shift leads to a poor experience for the user. Moving content is absolutely deadly when you are trying to score high with Core Web Vitals.
👍 Steps Outlined From The Video
- Install and activate WP Rocket
- Enable LazyLoading of images & iFrames
- Enable add missing image dimensions
💡 Helpful Resources to Complete Steps
STEP #5 🔥 Adjust Theme Performance Settings
In the previous step we installed and enabled two features that will be needed before we move forward in actually manipulating the content.
In this step there are some more performance features that are included with the premium add-on for the Page Builder Framework theme that we want to enable before we jump into actually working on the content itself to pass Core Web Vitals.
👍 Steps Outlined From The Video
- Turn on theme performance options
💡 Helpful Resources to Complete Steps
STEP #6 🔥 Adjust Theme Design Settings
Now we are actually going to begin with setting up our development site to look like the live production site. The first stage of this is to set up the basic theme design settings which will include things like your logo, color scheme, menu and other items that are duplicated on every URL in your website.
In most cases these items can be categorized into the content that displays in the header and the footer of your website. Other layout duplication that appears throughout the website would be the width of your content and lay out in reference to having a sidebar or not.
👍 Steps Outlined From The Video
- Setup content that is throughout the site
- Adjust header content
- Adjust footer content
💡 Helpful Resources to Complete Steps
STEP #7 🔥 Layout Home Page Content & Test Core Web Vitals
Your homepage is usually the most popular page and most visited URL on your website. This is the page where we are going to start in the adjustment of content layout which will pass Google’s Core Web Vitals.
During this process we will be running Google Page Insights tests and making sure that as we work through the content we are actually complying and receiving high scores in Core Web Vitals.
👍 Steps Outlined From The Video
- Layout content using Gutenberg editor
- Test score on Google Page Insights
💡 Helpful Resources to Complete Steps
STEP #8 🔥 Layout Inner Page Content & Test Core Web Vitals
In this step we are going to focus on the inner pages of our website and lay out the content on a page with the focus of scoring high on Core Web Vitals.
If you keep a focus on creating an inner page layout that you can duplicate to the rest of your pages it can really save you time if you have a website with hundreds of pages.
The Gutenberg editor allows you to create reusable blocks that you can used throughout your website with a few simple clicks instead of recreating content from scratch all the time.
👍 Steps Outlined From The Video
- Layout content using Gutenberg editor
- Create reusable blocks if needed
- Test score on Google Page Insights
💡 Helpful Resources to Complete Steps
STEP #9 🔥 Layout Post Archive Content & Test Core Web Vitals
The next area of content that we will focus on to improve our Core Web Vitals is going to be our blog archive page. This is the page where there will be a list of the blog posts that you have published on your site which exists on most WordPress websites.
If you do not have a Blog on your WordPress website you can skip this step and the next step.
👍 Steps Outlined From The Video
- Adjust your blog archive layout
💡 Helpful Resources to Complete Steps
STEP #10 🔥 Layout Single Post Content & Test Core Web Vitals
All right we are nearing the finish line of our content layout steps and the final piece of the puzzle in adjusting the content to pass Google’s Core Web Vitals is to lay out a post in our WordPress website.
In most cases this step will require very little effort as it is very rare that WordPress posts are ever built with a third party page building plugin and so the content will likely be identical on the new theme that we are using as it was on the old theme.
👍 Steps Outlined From The Video
- Adjust your blog single post layout
💡 Helpful Resources to Complete Steps
⚡️ Optimize Website For Speed to Pass Core Web Vitals
Now speed optimization is an entirely different post topic all together and while this article is sitting at just over five thousand words long a good detailed speed optimization article on how to make WordPress as fast as possible would probably be two to three times that.
Instead of us recreating content on WordPress speed optimization we have decided to share with you one of the most valuable articles that you can access on how to optimize your WordPress website using WP Rocket which is what we used here.
The Ideal WP Rocket Settings (2021) – view post below
https://onlinemediamasters.com/wp-rocket-settings/
Ready to setup the latest, best WP Rocket settings?
WP Rocket was rated the #1 cache plugin in numerous Facebook polls because it comes with more speed features than most other cache plugins.
That’s why it usually gives you better results in Lighthouse and GTmetrix. It also means you don’t need to install a bunch of extra speed plugins to preload fonts, clean your database, disable Heartbeat, and delay JavaScript.
This guide goes beyond configuring the WP Rocket settings. I explain how disabling “optimize CSS delivery” can fix cumulative layout shift issues, how to prefetch third-party code, delay JavaScript, preload fonts, and why I recommend Cloudflare or BunnyCDN over RocketCDN.
🤯 THIS GUIDE IS MIND BLOWING…. view it here
Yo, I’m Tom

I write tutorials on WordPress speed and SEO.
If you want to see 50 random and disturbing things about me (and cat pics), read my bio.
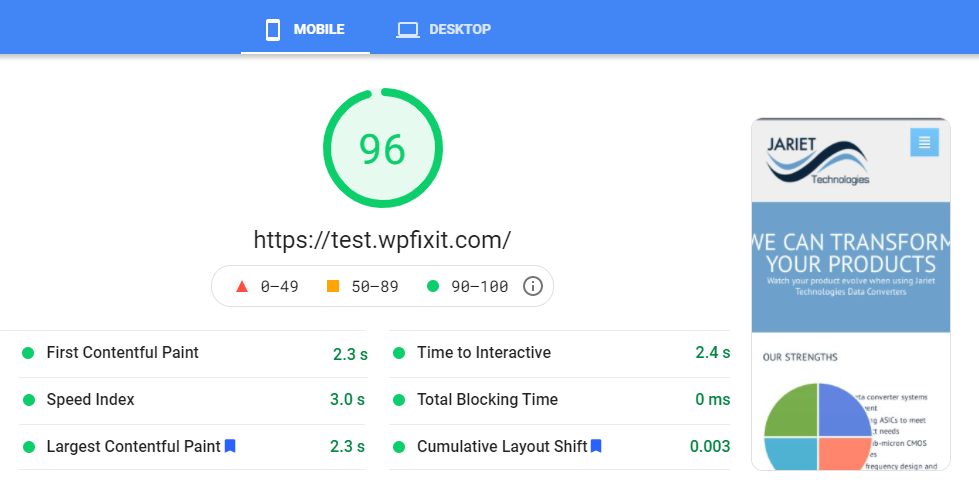
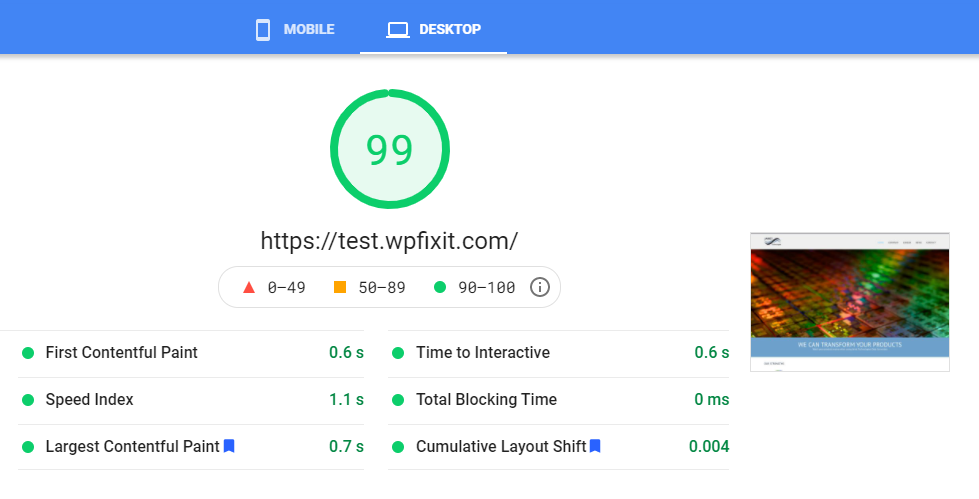
Please take a look at the before and after Google page insights testing that was completed on the production site and our development site that we went through the content on and speed optimization process to excel our scores on Google’s Core Web Vitals.
You can see the drastic improvement that has been made because of the steps that were completed and outlined in this post. These steps can be implemented into any WordPress site regardless of size.
BEFORE WE STARTED TESTING


AFTER WE DID THE WORK TESTING
🎉 Move Development Site to Live Site Location
Let’s just recap where we are now. We have gone through and we have rebuilt all of our content on a new streamlined WordPress theme. We then went through the process of optimizing the entire website to squeeze every ounce of speed out of it.
This means that we are now ready to take our development website to production. Simply put, we are basically just going to clone our development site to the production URL. It’s pretty much the reverse of what we did long ago in this article where we cloned the production site to a development area.
SUPER IMPORTANT BELOW:
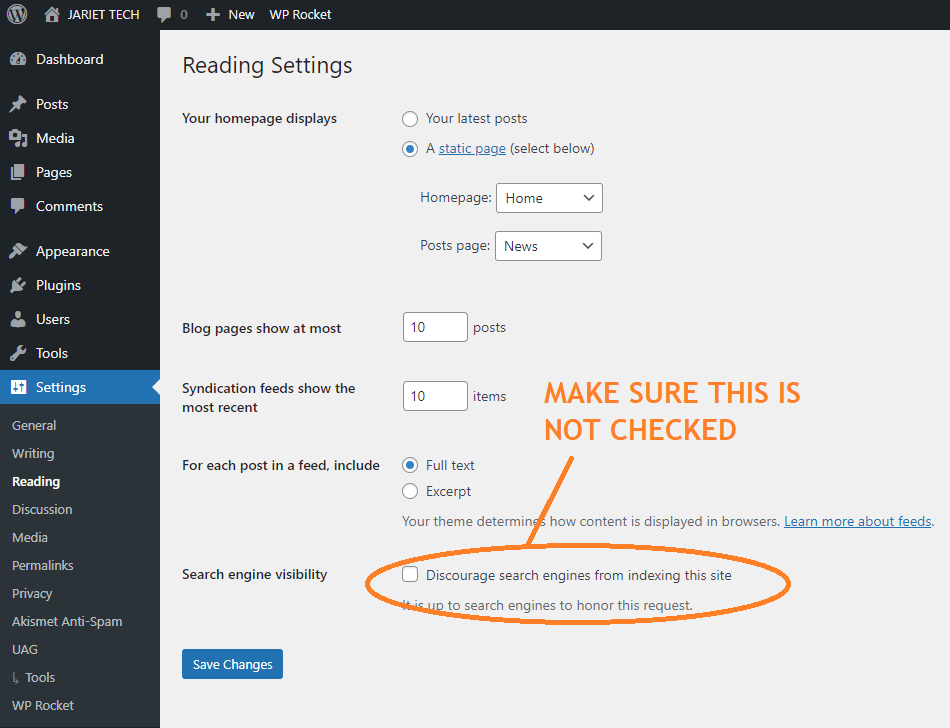
If you remember when we created the cloned website in our development area we turned off the ability for search engines to index the content.
Now that you have moved your development site to the live location, it is super important that you turn search engine index back on so the search engines can come and crawl your website content and allow you to get better rankings because of all the hard work you completed.
Take a look at the image below on exactly where you would turn this back on and make sure that this step is completed as soon as you move your development site into production.
We are now ready to take our hard work and put it to good use.
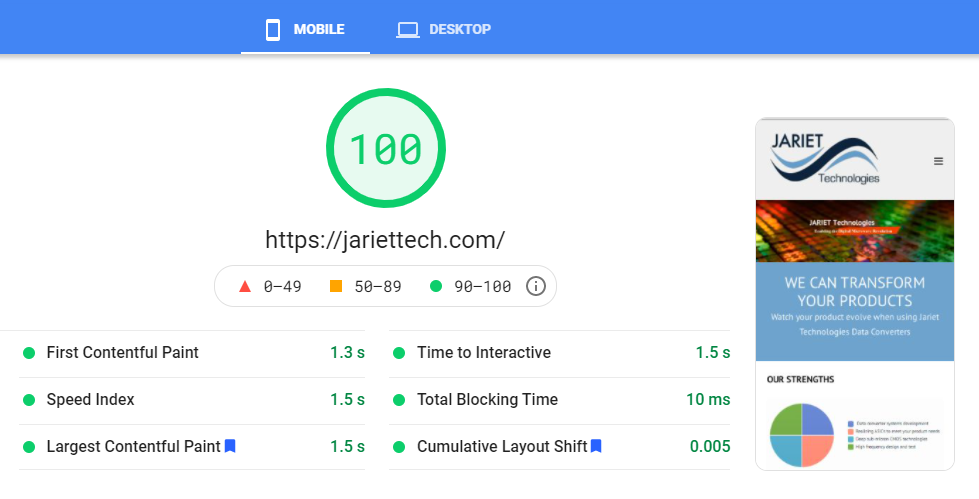
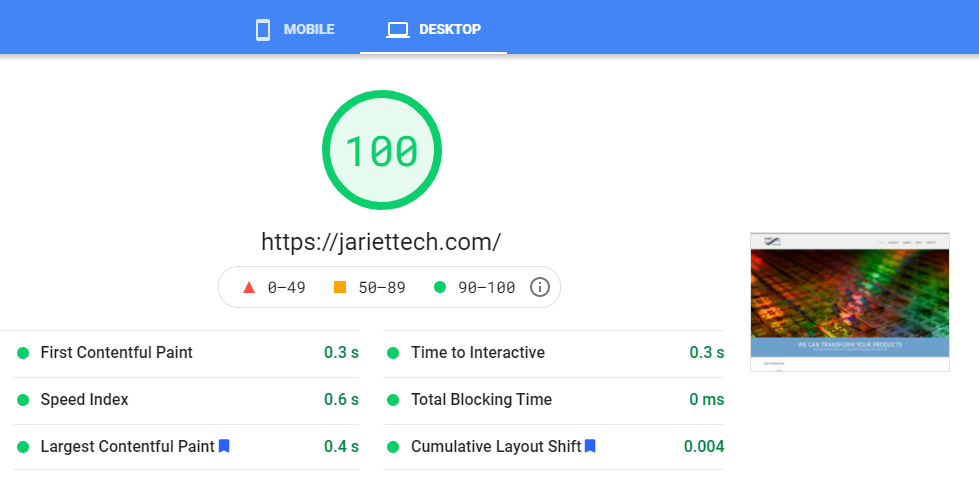
Take a look at the below final result from all this hard work that we did to pass Google’s Core Web Vitals and what an amazing result it is.
THE FINISHED RESULT ON LIVE SITE
🤓 Wrapping this bad boy up….
Hopefully we have done a good job here of explaining what Core Web Vitals are and why they are important. We also enjoyed showing you the exact process that you can take with your WordPress website to make sure that you are complying with Google’s new Page Experience grading system.
The sooner that you can do this the better because as mentioned in the very beginning of this article, the Page Experience grade and the scores you receive when testing Core Web Vitals is part of the ranking algorithm which will help your website URLs rise to the top of search results.
If the steps needed to comply with Google’s Core Web Vitals seem a bit overwhelming and outside of your comfort zone, we do offer two services below which can help do all of it or a portion of it that you are stuck on.
If you have any questions whatsoever feel free to CONTACT US HERE and we will rush to get those answered for you.
We hope that you found this article valuable and useful to your online success.


