Need to Move Hosted WordPress to Self Hosted WordPress?
(The Easy Steps and Why It’s a Good Idea)
WordPress is the most widely used content management system on the planet. But there is confusion about its use because there are different forms of the blogging system that you can use.
For example, when you choose WordPress.com, you are using a free system that is simple and reliable. Sounds ideal, but hold that thought. WordPress.org, on the other hand, is self-hosted, meaning you can find a place to set up your WordPress blog anywhere you want with your chosen domain.
Why Converting from WordPress.com to WordPress.org is a Good Idea
If you’re serious about your online brand, or just hate being hemmed in by too many rules and need to reset your WordPress site, you might want to consider this move. While WordPress.com is great for beginners, most find that they quickly outgrow the platform and want something more.
WordPress is always free to use, but you will need to get your own web hosting for WordPress.org. This might sound like a pain on the surface, but here are several reasons why this is a good idea.
- Custom domain name. If you’re trying to project a certain image or run a business from your blog, it’s not going to happen with something that looks like MySiteName.WordPress.com. Sure, you can get a custom domain name with WordPress.com, but it’s an expensive premium feature. When you self-host, you can pick any domain you want, and some are dirt cheap.
- Access to more themes. WordPress.com is a closed system that happens to be incredibly selective about the themes it will let you use. There are less than 200 free themes and some premium ones that are pricey. Change to WordPress.org and your theme choices will number in the thousands.
- Install third-party plugins. The same is true for plug-ins. You will be able to use popular, useful, and powerful third-party plugins with WordPress.org. These include Yoast SEO and the Disqus Commenting System.
- Customize the code. Not everyone wants to tweak their code, but if you do, WordPress.com won’t allow this. Use WordPress.org, however, and you can make any changes you wish.
- Start running ads. When you use WordPress.com, the ads that run on your site send revenue to WordPress, not you. Switch to a hosted site, and you can run all sorts of ads and make some cash.
- Branch into e-commerce. WordPress.com doesn’t provide any ways to set up an online store, but WordPress.org has a ton of e-commerce plug-ins and themes.
- Control your destiny. Few people like to be told what they can and cannot do, and WordPress.com just has a lot of rules. When you host your own site, you have much more freedom, within reason, to control how your site appears and what you will gain from it.
Steps to Migrate Your Blog from WordPress.com to WordPress.org
Now that we’ve established why it’s such an excellent idea to make this move, it’s time to do a little work. (It’s not that difficult). Here are the steps you’ll need to take to complete this transition.
Step 1: Export Your WordPress.com Content
One of the benefits of WordPress is that it’s simple to use and even move from one place to another. Your first step should be to log in to your WordPress.com site to export your content.
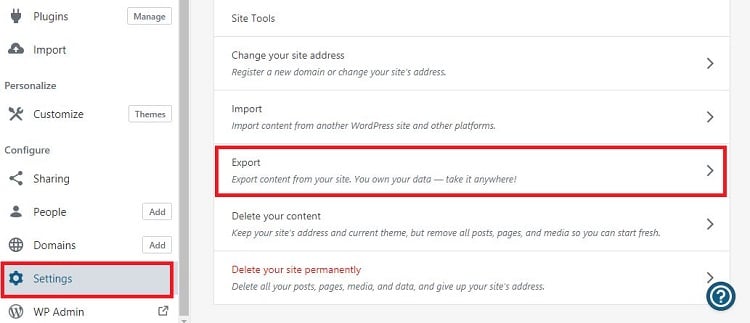
- You may have more than one site in your WordPress.com. Choose the one you want to export.
- On the dashboard of that site, scroll to the bottom of all those options and click on ‘Settings’ on the left sidebar.
- On the next page, click ‘Export – Export content from your site.’
- From this page, you can choose what to export for your new site. In most cases, you’ll want to export “All Content,” which includes Posts, Pages, Comments, and Media.
- Make your selection and then click “Download Export File.” This will provide you with a single XML file. Keep note of where this is stored.
Step 2: Get A Domain Name
Some WordPress.com sites already have a custom domain name. If you have this, you should be able to use it on your new site by changing the DNS to your new host. If you don’t have a domain name, it’s time to pick one that closely aligns with your blog or website.
Step 3: Set Up Your Hosting Account
To use WordPress.org, you’ll need your own hosting account. This is simpler and cheaper than it sounds. You can find the website hosting cost is in between the range of $3-$10 per month that comes with easy tools for WordPress installation.
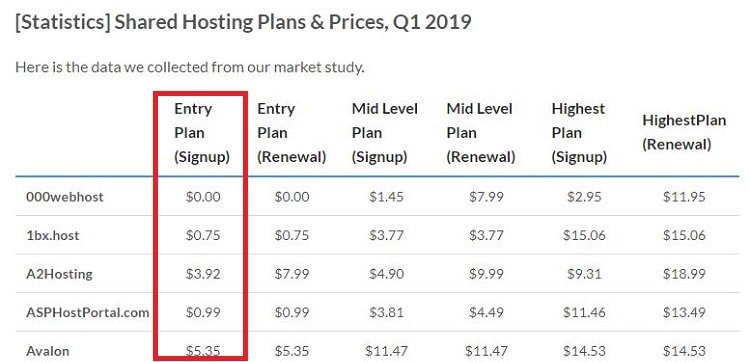
Once you set up that hosting account, find out what the DNS settings should be and change them in your domain account. In some cases, you can buy and manage domains from the same company that you choose for web hosting.
Step 4: Install WordPress
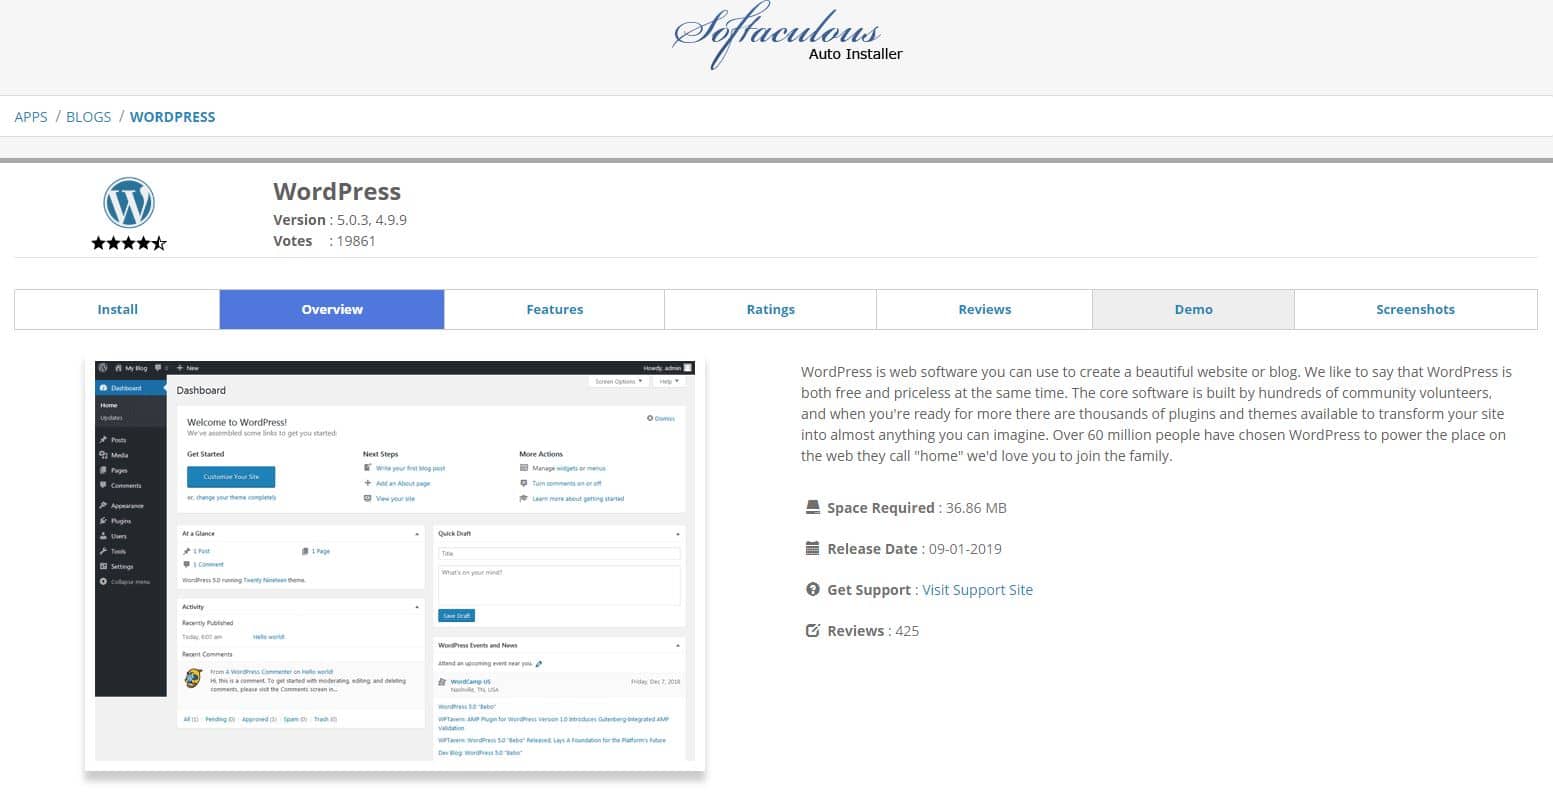
Now that you have a web hosting account, it’s time to install a fresh version of WordPress. Most accounts offer a push-button install of WordPress such as Softaculous Auto Installer. If yours doesn’t, WordPress is still simple to install with this tutorial or get help from WPFixIt.
Step 5: Import Your WordPress Content
When you log in to your new WordPress site, it’s going to look like a blank and barren landscape. You can quickly fix this by importing that XML file from your WordPress.com site.
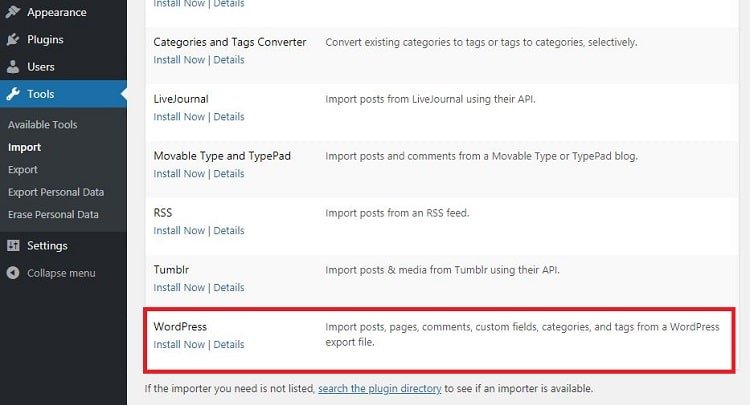
- From your Dashboard, go to “Tools” > “Import.”
- Select the last option on the list, “WordPress,” and click “Install Now.”
- WordPress installs an import tool, and then you will need to click the “Run importer” link.
- From the “Import WordPress” screen, click “Upload file and import.”
- Note: If your file is larger than 32MB, you have two choices. You can ask your web hosting company to increase your limit, or you can split the file in two using WXR file splitter.
- When you run the importer, you’ll be able to assign the imported content to a current user or create a new one.
- Also, make sure to check the box to “Download and import file attachments” so that your posts will have images!
Step 6 Set Necessary Re-directs
One of the top concerns many of us are worried about after moving their websites is SEO. After all, your visitors may already used to your previous URL including search engines like Google, right?
If you simply move your site without informing your visitors, you’re likely to lose traffic. One of the best ways to handle this is to set up a redirect which automatically sends visitors from the old site to the new one.
The catch is that it costs money – but not much. WordPress.com has a Site Redirect service that costs just $13 per year. This service seamlessly sends any visitor from your old WordPress.com site to the new self-hosted site.
Conclusions
Once you have your new site up and running, you’ll be able to do all of those things that you couldn’t do on WordPress.com. This includes running ads, setting up an online store, using certain plug-ins and themes, and even tweaking the code. Of course, you are also prone to common WordPress error that should keep you busy and entertained for quite some time.


